It is common for users to back their iPhone data up on the Mac but in the case that the Mac itself is running low on space, it is now time to backup iPhone to External Hard Drive. In this day and age of massive amounts of data, back up must be prioritised. Who better than us would understand how tragic it would be if the picture that would be perfect for your Instagram feed gets lost? Let’s get you that good nights sleeping after generating massive amounts of data on a daily basis by finding out how to get backups!
Before we discuss storage on External Hard Drives, it is important to discuss that backups can be taken on iTunes very easily. To achieve this, you must just plug in the iPhone to the Mac using a lightning cable. Then, you can create a backup folder, if you please, on iTunes itself and store all your data there.
How to Backup iPhone to External Hard Drive?
Follow the following quick and simple steps to get started with the backup process.
1. Figure Out Where in iTunes The Backups are Present
Like discussed above, if you are doing it manually and creating a separate folder, then this is an easy step. In all other cases, you must follow the steps given below:
- Start iTunes.
- On Macbook, locate iTunes on the upper left corner and then, click on it.
- In the drop-down menu, select Preferences
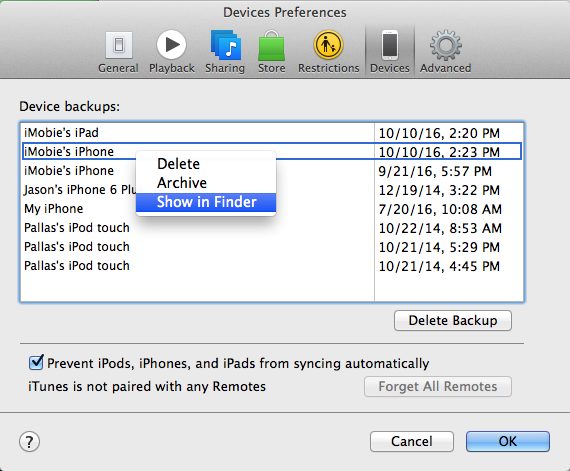
- Click on Devices.
- Locate the device you wish to procure a backup of and select it.
- Once this is done, you must hold the control key down and click on this device.
- You will see a bunch of options displayed, you must select show in finder.

2. Store This Data on an External Hard Drive
Now that we have located where exactly all the data that needs to be backed up is saved, it is now time to move it all on an external hard drive. To do this, pay attention to the steps mentioned below closely:
- The first and most obvious step is to connect the hard drive to the computer.
- Open the hard drive on Mac.
- We found out the folder wherein all the backups were saved. It is now time to move this folder.
- Move this folder to the external hard drive.
- To move forward with this process, you would have to enter the computers administrator credentials.
- Do not delete this folder just yet. Rename it to ‘oldbackup’ or anything else.
3. Changing of Permissions
A symlink is a way to inform iTunes of the new location. symlink stands for Symbolic Link. Do not ignore this step as it is crucial for taking out backups of the data on an external hard drive. Without this step, be aware that you would have to manually move all the backup folders on to the Mac. How a symlink works is that it creates a whole new path for iTunes which is used to locate the backup folder.
Before we start:
If you are using macOS Mojave, you need to alter some permissions in order to proceed. This is what you have to do:
1. First and foremost, you must open up System Preferences.
2. In the menu, tap on Security & Privacy.
3. Of the two tabs, go to the Privacy tab.
4. Now, there are 2 possibilities. The screen could be locked or not.
5. If the screen is locked, tap on ‘Click the lock to make changes’. Now simply enter the password and select ‘Unlock’.
6. Now, if your screen was not locked, locate Full Disk Access on the left-hand side of the screen and click on it.
7. Select the ‘+’ and then include Terminal to be present on the list of those apps that may gain complete control over the system.
8. Type out ‘Terminal’ on the Finder Screen and then, in the search results, you must highlight Terminal.
9. Then, click on Open.
4. Creation of Settings
Now that the required settings have been changed, it is time to create the symlink.
- Use Spotlight in order to search for Terminal.
- Now, you need to enter a code. But, before we enter this code, let us understand what it means.
ln-s/Volumes/(name_of_your_hard_drive)/(name_of_backup_folder_on_hard_drive)~
/Library/Application/Support/MobileSync/Backup/(name_of_the_device_backup_folder)
3. Once the code has been typed, tap on Return.
4. Then, finally, quit the Terminal Application.
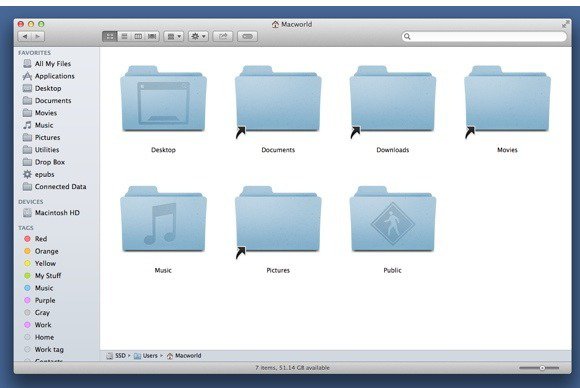
If you followed all these steps correctly, you should be able to view a new folder created in the MobileSync folder. This new folder would mostly be named ‘Backup’. If you do not find a folder named ‘Backup’, look for a folder that consists of an arrow at the bottom left corner of the folder icon as seen in the picture below for the following folders:
- Documents
- Downloads
- Movies
- Pictures

5. Before You Delete The ‘oldbackup’ Folder
In order to avoid data loss, it is important that we check if this whole process worked. To do this, perform the following steps:
- Open iTunes.
- Using a lightning cable, connect the iPhone to the computer and back it up.
- On the Hard Drive, open the folder that contains the backup.
- Now, check if the date and time mentioned for this folder is the date and time of the moment the backup process was completed.
If the date and time match, it means that all the backups are being automatically saved in the correct location. Now, you may delete the ‘oldbackup’ folder without having to worry about any sort of data loss. If the date and time do not match, this means you have made a mistake in following some of the steps and it is now time to read this article once again and figure out your mistake!
Final Verdict
No matter how much storage you might have eventually you will run out of data, so it essential to backup your iPhone to an external hard drive. I hope the article will help you backup iPhone to External Hard drive.

![How to Unblock a Number on iPhone [5 Ways] – 2024 Guide How to Unblock a Number on iPhone [5 Ways] – 2024 Guide](https://www.digitalcare.top/wp-content/uploads/2019/05/call-211x150.jpeg)
![Fix External Hard Drive Not Showing up on Mac [9 Methods] – 2024 Guide Fix External Hard Drive Not Showing up on Mac [9 Methods] – 2024 Guide](https://www.digitalcare.top/wp-content/uploads/2018/12/images-2-211x150.jpeg)
![How to Run Windows on Mac [4 Free Methods] – 2024 Guide How to Run Windows on Mac [4 Free Methods] – 2024 Guide](https://www.digitalcare.top/wp-content/uploads/2018/12/as-211x150.jpg)